Edit a Line Item
To edit a line item, simply follow the steps below:
- Go to the Campaign section (click on Campaigns in the header of the RMP to access the Campaign section)
- Find the campaign in which you want to edit a line item and click on its campaign name
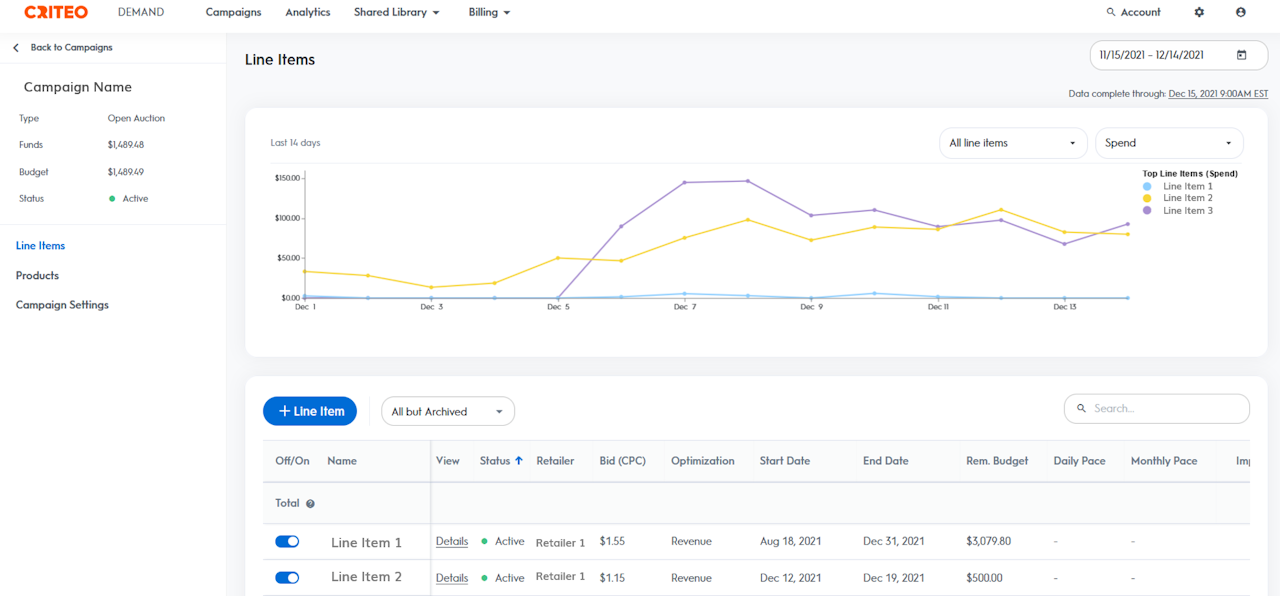
- You'll land on your campaign page, where you can see all line items. You can click on a line item to go to the first page of the line item settings (name, retailer, dates, budget, and pacing)
- If you want to edit:
-
- Name, Dates, Budget, Pacing, Bid, or Optimization strategy:
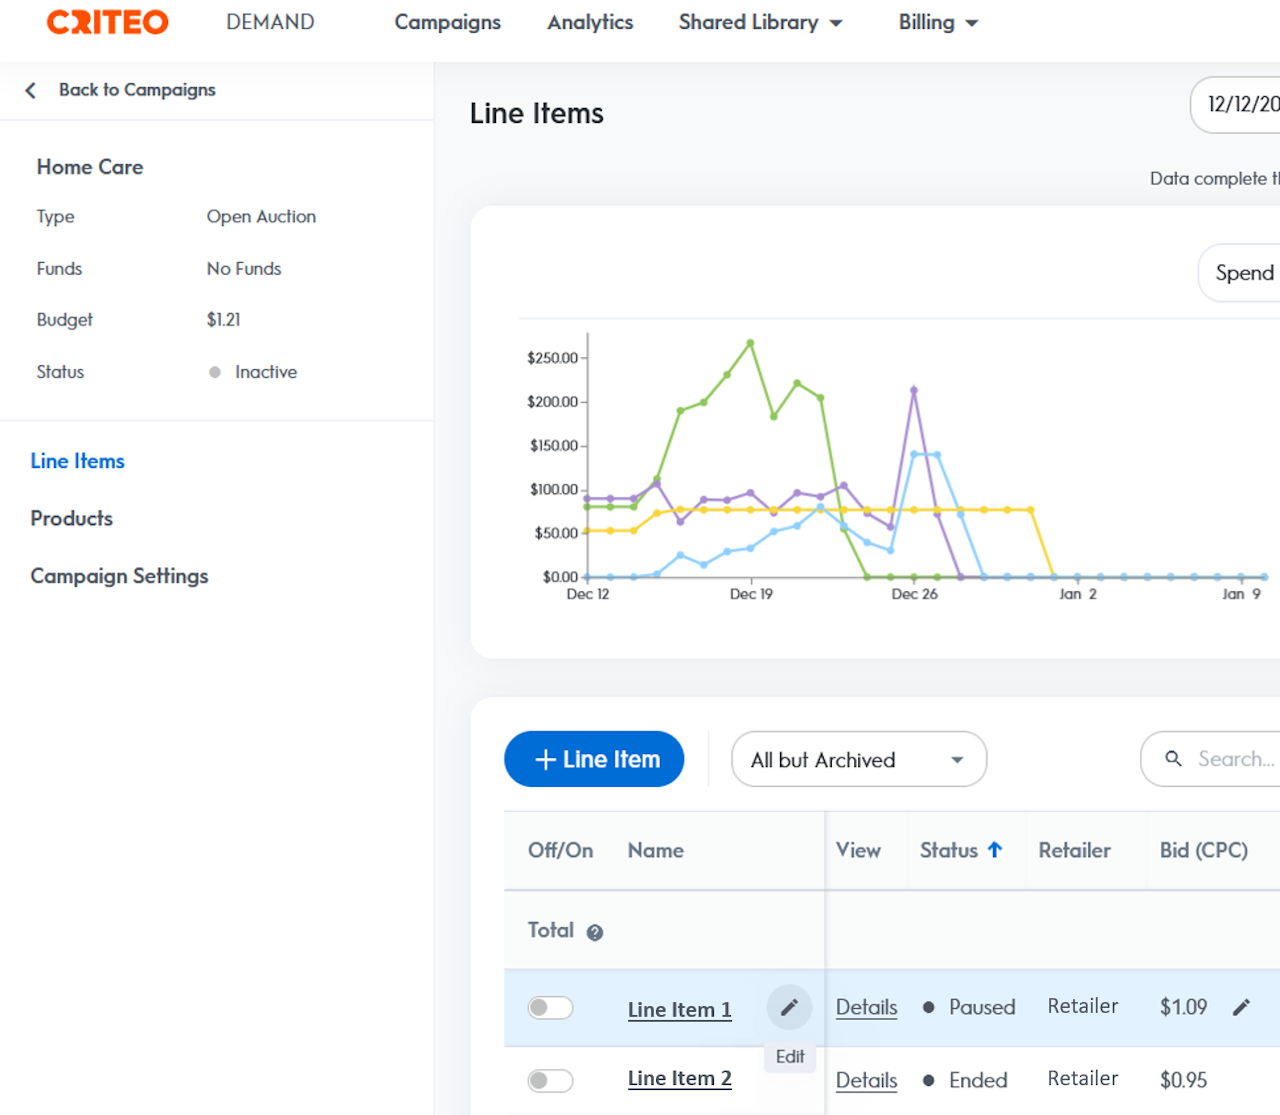
Click on the edit icon in the line item table, next to the settings you want to change. - All settings above and/or the Products:
Click on the line item name in the table; you’ll be redirected to the same workflow as the one you used to create the line item and will be able to edit most of its settings.
- Name, Dates, Budget, Pacing, Bid, or Optimization strategy:
-
Edit a Line Item Budget
Line item budgets help you control your advertising costs for specific products. In RMP, you can decide to either set a total budget for your line item or leave your line item uncapped. You can edit a line item budget at any time, effective immediately.
On the Campaigns page, click the name of the campaign that contains the line item you want to edit.
On the Line Items page, click the name of the line item you want to edit.
Click the Edit icon in the Rem. Budget column.
If switching from uncapped to capped, select Capped and enter the amount to cap the budget at a set amount. Once your line item reaches the set budget amount, it will stop delivering ads.
If switching from capped to uncapped, select Uncapped if you'd like your line item to spend freely from your campaign's budget.
If editing your capped line item budget, choose Increase By or Decrease By and enter the amount to add to or remove from your line item's remaining budget. You can mark the New Remaining Budget checkbox to make sure the budget corresponds to the amount you want your line item to be able to spend.Click Save.
Edit Name, Retailer, Dates
To edit the name here, simply change the name in the field and make sure that it is different than other line items in the campaign. Click on Save or Continue before exiting.
Editing a line item Retailer
In Step 1 of your line item editing,
you can see the previously selected retailer. The input field under the
retailer box is grayed (disabled). This is because you cannot edit the retailer selected for your line item after launching it.
If you need to select another retailer, we recommend that you set up a new line item with the new retailer and product(s).
Click on the edit icon next to the line item dates in the table, or in Step 1, you can see the setup dates under the Schedule box.
To
edit the dates, simply select new dates and save. You can choose
today’s date or any date in the future for the start date. For the end
date, select either “None” or a specific date. Click on Continue or Save before exiting.
Note that a change of your line item dates can cause a change of its status as well.
Edit Budget and Pacing
Click on the edit icon next to the line item budget OR in Step 1 of your line item workflow, you can edit the budget.
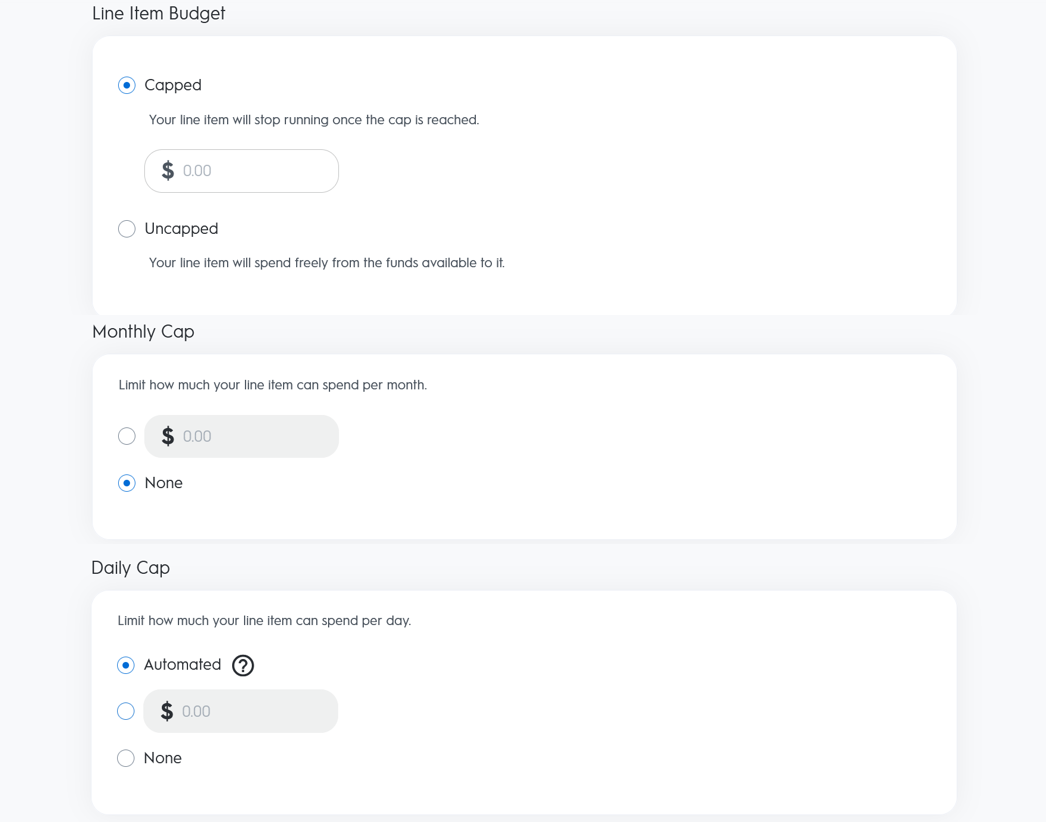
You have two options available for editing your budget:
-
Uncapped budget:
Select Uncapped.
Your line item will spend freely from the funds available at the campaign level. The available funds are determined by the campaign budget that can be capped or uncapped.
Your line item will stop spending once the campaign budget is reached. At this point, your line item status will switch to "Budget Hit". -
Capped budget:
Click on Capped and select either Increase by or Decrease by from the dropdown to enter the amount you’d like to add or remove from your current remaining budget.
You can see then the new remaining budget at the bottom of the Line Item Budget box.
Your line item might not spend the entire amount. The amount is used as a cap and your line item will stop spending when it is reached.
Click on the edit icon
next to the line item daily pace OR in Step 1 of your line item
workflow, you can edit the pacing of your budget delivery.
A daily pace can be helpful to ensure your budget lasts for the duration of your line item's schedule.
To edit a daily pace, you have two options.
-
Strict amount:
Click on the amount line and enter an amount.
This amount will serve as a daily cap. Every day, your line item will stop serving ads and switch to a “Budget Hit” status when this amount is reached. The line item will automatically reactivate at the start of the next day (as long as there are funds available for it to spend). -
Automate
Enter a line item end date and a total budget or a monthly pace in order to be able to activate the Automated option. The Automated option will adjust your daily pace at the beginning of each day based on the line item end date and remaining budget.
For
example, if your line item is set to last for 30 days and the total
remaining line item budget is $30,000, then the Automated option will
set a pace of $1,000 delivery per day.
This option is helpful
if the line item does not reach its daily spend every day, but you want
to make sure it has the opportunity to spend the full budget.
For example, your line item underspends for the first 10 days, and on the $30,000 total budget, you still have $25,000 to spend in just 20 days. The automated daily pace will calculate that the line item daily pace should be $1,250 per day in order to spend the remaining budget. With this option, you don't have to adjust your daily pace every day based on yesterday's spend, the Automated option will do it for you.
Editing a monthly paceClick on the edit icon
next to the line item monthly pace or in Step 1 of your line item
workflow, you can edit the pacing of your budget delivery.
To edit a monthly pace, click on the amount line and enter a new amount. Click on Continue or Save before exiting.
This
amount will serve as a monthly cap. During the month your line item
will stop serving ads and switch to a “Budget Hit” status when this
amount is reached. The line item will automatically reactivate at the
start of the next month (as long as there are funds available for it to
spend).
Edit Products
SKUs can be added or removed in Step 2 of your line item workflow.
To view the products you currently have in your line item, click on the Selected Products tab in the second box in the Select Products page.
To remove a SKU from your line item, simply click on it. The checkbox will uncheck, which means that your line item will no longer promote the unselected product. Click on Continue to save your edit.
Adding new products
Click on the line item name in the table, you’ll be redirected to the same workflow as the one you used to create the line item. OR, in Step 2 of your line item editing, you can view all promoted products and edit the list.
SKUs can be added or removed from an existing line item.
To
view the products you currently have in your line item, click on the
Selected Products tab in the second box in the Select Products page.
To add a new product, you can either use the ‘Search Account Catalog’ or ‘Find matches by product IDs’ option.
If you search by keyword (Search Account Catalog), all products with a matching word in their name will be returned.
With
the product ID (Find matches by product IDs) option, you first select
the type of product ID you're searching by and then enter the IDs (one
per line). The search will return all exact matches, and let you know if
some don’t exist.
Pause Product Delivery
You can toggle delivery for all
selected products within a campaign or line item at any time. Pausing a
product will stop the campaign and line item from delivering any ads of
that product. Un-pausing will resume delivery for that product if it is
in stock. You can toggle products On/Off at both the campaign and line
item level.
At the Campaign level:
-
On the campaign landing page, click on Products in the left-side navigation menu.
-
You will land on a page that shows you all products that are being targeted within the campaign. Click the On/Off toggle next to any product to turn delivery for that product on or off.
At the Line Item level:
-
From the campaign landing page, select the line item you want to adjust the delivery for.
-
Click on Details in the View column.
-
On the resulting products page, click the On/Off toggle next to each product to adjust the delivery for that product.
Important: After a
product is paused, it will be removed from the default view of the
product dashboard. To view the paused product in the data table, adjust
the filter of the table to include “On and Off Products”.
Also, you cannot adjust the bid of a paused product. To adjust the bid of a paused product, you must first un-pause it and then adjust the bid.
Edit Negative Keywords
Click on the
line item name in the table to edit your keywords. You’ll be redirected
to the same workflow as the one you used to create the line item. Click
into Save & Continue on step 1 to reach Step 2: Select Products.
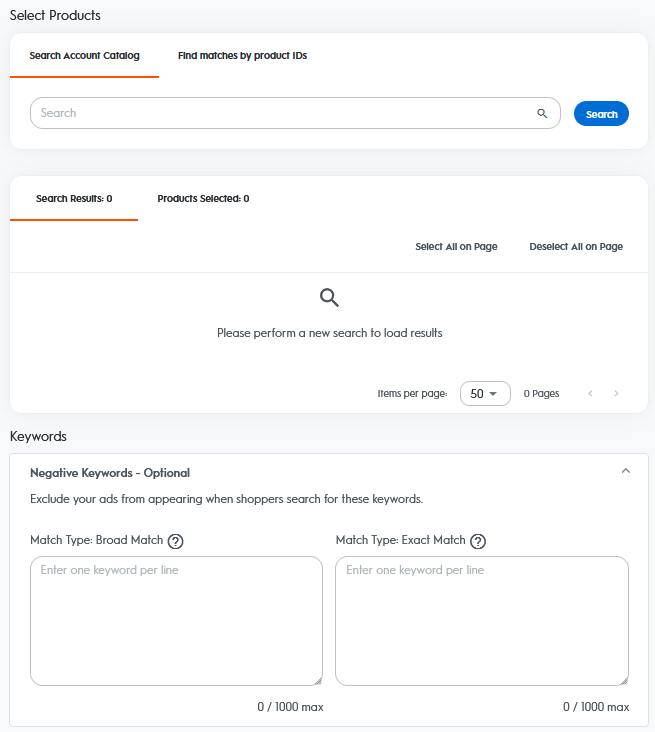
From here you can enter the keyword(s) you want to exclude your ad from appearing on in the Negative Keywords section below the product catalog. Simply add or remove inputs to edit the selection.
When you're done, be sure to navigate through all the line item steps, up to step 4 - Review, and click on Launch. Otherwise, your negative keywords will not be taken into account.
Negative Keywords may be entered as either Broad Match or Exact Match.
Note that they would be applied to your line item within 15-30 minutes after you saved.
Negate search terms that include the keyword or continuous keyword string, including all stemmed variations of the keyword(s).
For example, if men’s shoes is a negative keyword, your ad won’t show for blue men’s shoes but it may show for shoes and men’s basketball shoes (as basketball breaks
up the continuous phrase). Your ads may continue to serve for search
terms that include additional keywords within the keyword string - but
not before or after a continuous negative keyword string - or that don’t
include all keywords in a negative keyword string.
Negate search terms that are the exact keyword or keyword string, including all the stemmed variations of the keyword(s).
Your
ads may continue to serve for search terms that include any additional
keywords or that don’t include all keywords in a negative keyword
string.
A few tips below:
-
Enter one keyword or keyword string per row.
-
Keywords are not case-sensitive.
-
Keywords will be applied to all products targeted in the line item, therefore, to negate keywords for only certain products, create a separate line item for these products.
-
Duplicate entries will be automatically de-duplicated.
-
The same keyword entered in both match-type textboxes will be considered as two keywords. For example, “remote control” in the Broad Match textbox and “remote control” in the Exact Match textbox are counted as two keywords.
-
Negative keywords take priority. Meaning if a keyword is in both the Negative Keyword section and the Submitted Keyword section, it will be treated as a Negated Keyword.
-
Up to 1,000 Broad Match and up to 1,000 Exact Match negative keywords can be entered per line item.
-
Special characters are permitted but may automatically be parsed.
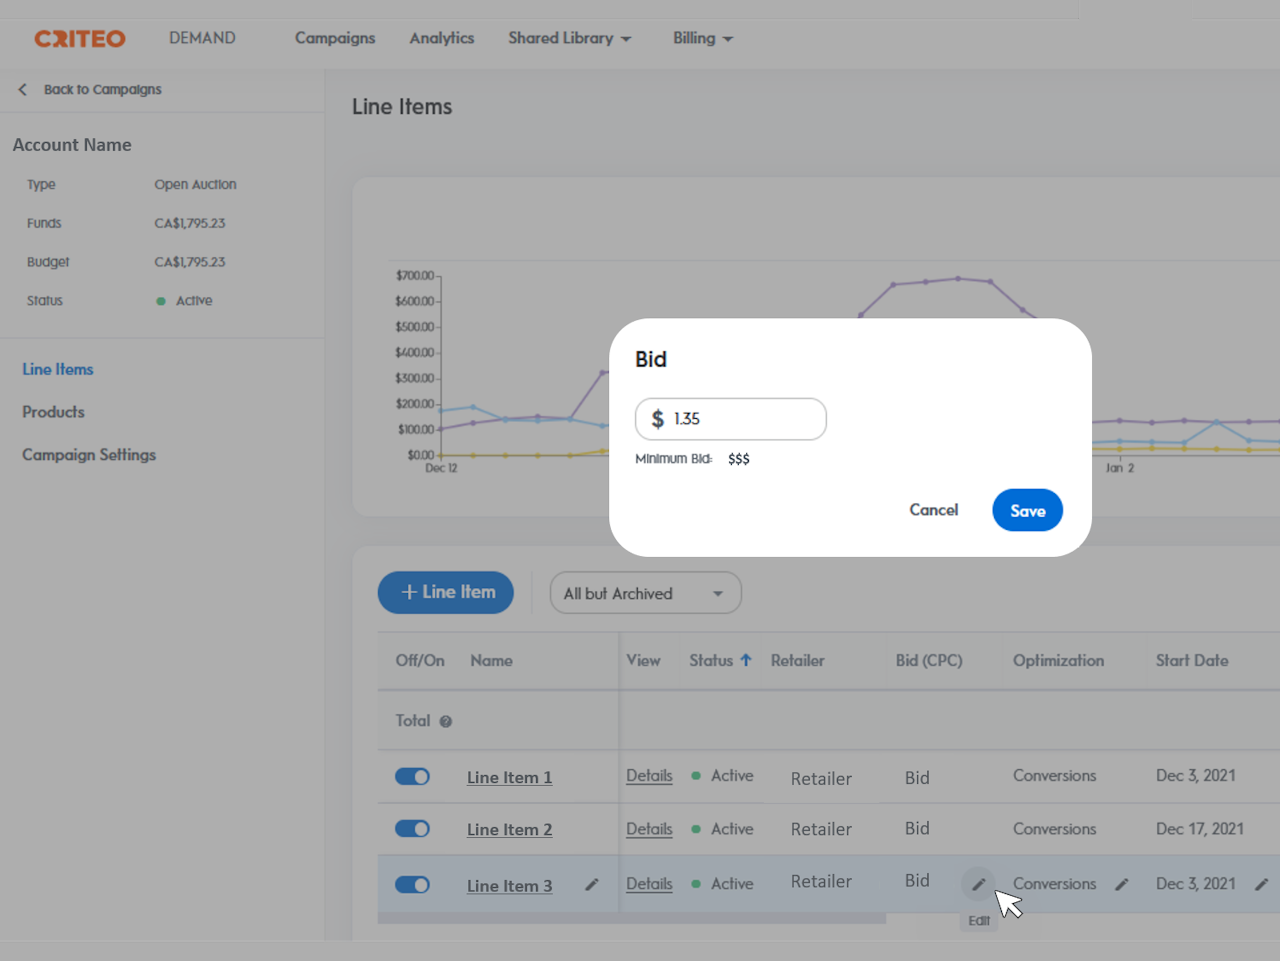
Edit Bid
Click on the edit icon next to the line item bid in the table. OR in Step 3 of your line item workflow, you can edit your CPC bid.
To modify it, simply enter the amount in the input field in the Bidding box.Edit Optimization
You can switch between Clicks, Conversion, and Revenue optimizers.
In the Optimization box, simply select your new optimizer.
For more information about the RMP optimization strategies, please visit Line item optimization options.
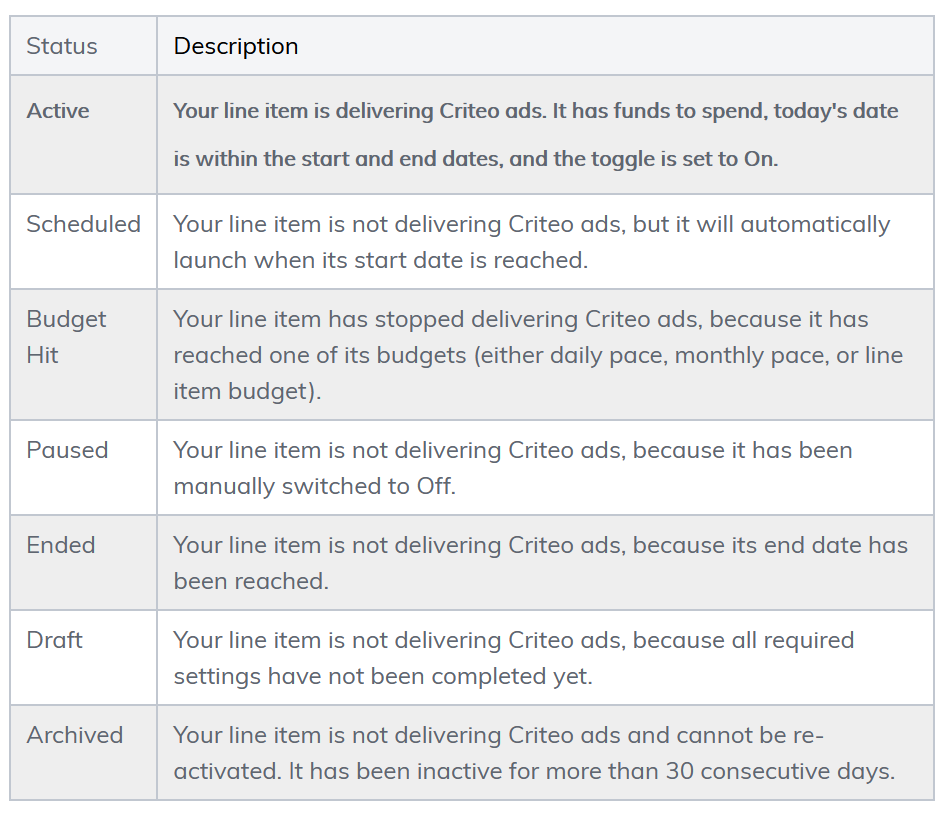
Edit a Line Item Status
To view the status of your line item, follow the steps below:
- Go to the Campaign section (click on Campaigns in the header of the Criteo Retail Media Platform to access the Campaign section),
- Find the campaign in which you want to edit a line item and click on its campaign name,
- You'll land on your campaign page, where you can see all line items and their status.
A line item status can change if:
- it has been completed and saved,
- its start or end date is reached,
- its daily or monthly pace is reached,
- the Off/On toggle is manually switched,
- it has been inactive for the past 30 days.
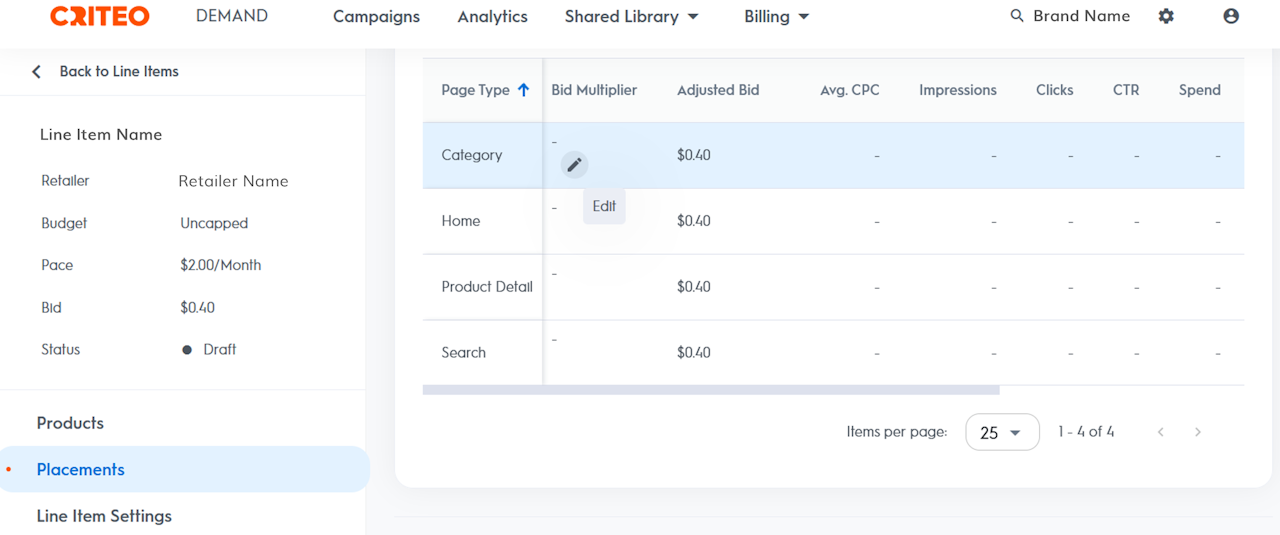
Edit Page Type Bids
You can increase or decrease the bids for specific page types, like Home or Search pages, for Open Auction campaigns using the Bid Multiplier feature on the Demand side of RMP. If a page is doing well, you might want to optimize that page to have a higher bid. Or, if a page is not performing as well as expected, you can optimize that page to have a lower bid. You can increase a bid by up to 500% or decrease a bid by up to 50% for each page type targeted at the line item level.
For example, for a line item that has a bid of $1, you may want to increase the Category page bid by 10% and decrease the Home page bid by 30% in order to optimize delivery and performance. The line item bid would then be $1 for all page types except for the Category page, which would have an adjusted bid of $1.10, and the Home page, which would have an adjusted bid of $0.70.Complete the following steps to add a Bid Multiplier percentage for a bid.
- In RMP on the Campaigns page, click the name of the campaign for which you want to edit a line item.
- On the resulting Line Items page, click Details in the View column of the desired line item.
- Click the Placements page.
- Click the Edit icon in the Bid Multiplier column of the page type you want to adjust.
- In the dialog that opens, enter the percentage you want to increase or decrease the bid by, and click Save.
- You can view the Bid Multiplier percentage and the resulting Adjusted Bid amount on the Placements page.
Important: You cannot adjust the bid to be below the product’s minimum bid. If you enter a bid percentage that results in an adjusted bid that is lower than the product’s minimum bid, the product’s minimum bid will be used.
